The first cool Saturday in October, I came home from the orchard with a half-bushel of apples and a plan for applesauce. Two hours later the sauce was in the pot, and the cutting board next to it held a heap of peels and cores nearly as tall as the apples had been.
For years that pile went straight to the compost bin. Now half of it goes into a quart jar on the counter, and about six weeks later it comes back to me as apple scrap vinegar. It is one of the easiest ferments I make, and one of the most misunderstood.
Here is why a heap of peels matters. The USDA estimates that food waste in the United States runs between 30 and 40 percent of the food supply, and the EPA reports that food is the single most common material sent to landfills, making up 24 percent of landfilled municipal solid waste. Apple scraps are a small piece of that, but an easy one to fix: peels and cores still hold sugar to ferment and pectin to set jelly.
Some links in this post are affiliate links. As an Amazon Associate I earn from qualifying purchases, at no extra cost to you.
How Apple Scraps Turn Into Vinegar
Every vinegar is made in two fermentations, one after the other. Penn State Extension lays the cider-vinegar process out in four steps: make a clean juice, change all of the fruit sugar to alcohol, change all of the alcohol to acetic acid, then clarify the result to stop further fermentation. Apple scrap vinegar follows the same path, only you start with peels and cores in sugar water instead of pressed cider.
In the first stage, wild yeasts on the apple skins eat the sugar and make alcohol and carbon dioxide. In the second stage, acetic acid bacteria take over. They need oxygen, which is why the jar stays covered with cloth instead of a lid, and they slowly turn that alcohol into acetic acid, the compound that makes vinegar sour.
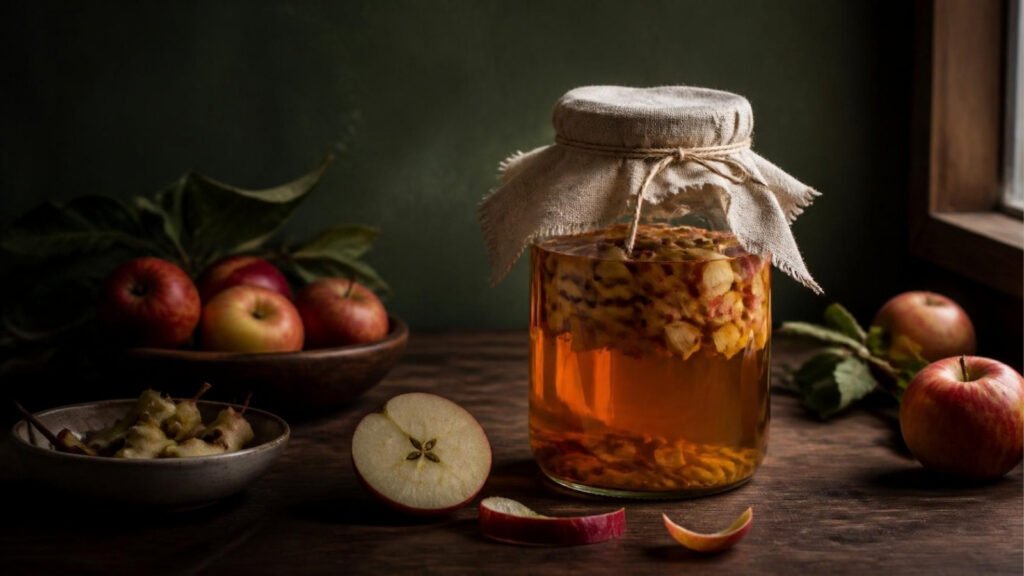
As the bacteria work, they often build a rubbery, translucent disc on the surface called the mother. Penn State Extension describes the mother as a mass of yeast and bacterial cells that grow naturally during vinegar fermentation, and notes there is no harm in eating it. NC State Extension adds that the mother should not be disturbed while it forms, and that it can be used to start a new batch.
Scrap vinegar is a wonderful kitchen vinegar and a terrible canning vinegar, and the difference is a number you cannot measure on your counter.
Temperature matters more than most recipes let on. Penn State Extension recommends keeping fermenting cider between 60 and 80 degrees Fahrenheit, noting that lower temperatures do not always produce a usable vinegar and higher ones interfere with the formation of the mother. In a Missouri kitchen in October, that is most counters away from the stove.
My Working Method for Apple Scrap Vinegar
The ratios below are my rule of thumb after several seasons of batches, not a tested extension recipe. They work reliably for me for a quart jar.
- Gather the scraps. Peels and cores from roughly 4 to 6 apples, enough to loosely fill a wide-mouth quart glass jar about three-quarters full. Use clean, sound scraps only. Cut away bruised, rotten, or moldy spots and compost them instead.
- Make the sugar water. Dissolve 1 tablespoon of plain cane sugar per cup of water. For a quart jar I use about 3 cups of water and 3 tablespoons of sugar. The sugar feeds the yeast and gets fermented away.
- Fill and weigh down. Pour the sugar water over the scraps until they are covered, leaving about an inch of headspace. Scraps that float up into the air are where mold starts, so I press them under with a small glass fermentation weight or a small clean glass jar that fits inside the mouth.
- Cover with cloth, not a lid. Use a tight-weave cotton cloth or a coffee filter secured with a rubber band. NC State Extension advises covering vinegar containers with cloth to keep insects out, and in apple season that means fruit flies. Glass is the right vessel: Penn State Extension warns against metal containers because the acid will corrode metal and aluminum.
- Stir daily for the first stage. Keep the jar at 60 to 80 degrees and stir once a day for about 2 to 3 weeks, pushing the scraps back under each time. Bubbles should show up within a few days.
- Strain. When the bubbling slows and the scraps start to sink, strain the liquid through a fine sieve or cloth into a clean glass jar. The spent scraps go to compost.
- Second fermentation. Re-cover the jar with cloth and leave it alone, no stirring, for another 3 to 6 weeks. This is when the mother forms and the alcohol turns to acid. Both Penn State and NC State Extension put the acetic stage at roughly 3 to 4 weeks under good conditions; cooler kitchens run longer.
- Taste, then finish. From about week four, taste with a clean spoon slipped under the mother. Sharp and sour with no boozy edge means done. Cap it and store it in the refrigerator, or pasteurize it: Penn State Extension says the vinegar must reach at least 140 degrees to pasteurize, and should not exceed 160 degrees. Save the mother, in a little vinegar, to jump-start the next batch.
Where I’ll Be Honest With You
Homemade vinegar is not canning vinegar. This is the one rule I will not bend. The National Center for Home Food Preservation recommends white distilled and cider vinegars of 5 percent acidity for pickling and states plainly not to use a vinegar with unknown acidity. Penn State Extension is even more direct: do not use homemade vinegar when pickling, because the acidity of homemade vinegar is not consistent, and do not use it in foods to be canned or stored at room temperature. University of Wisconsin Extension warns that a vinegar at 4 percent or lower may not be strong enough to safely preserve food. You cannot judge your batch’s acidity by taste, and a pH strip does not answer it either, because pH and percent acidity are different measurements. Use store-bought vinegar labeled 5 percent acidity for anything that goes on a pantry shelf.
What scrap vinegar is good for, according to that same Penn State guidance: salads, cooking, and refrigerator or freezer pickles. That covers most of how I use it anyway.
Kahm yeast, the mother, and mold are three different things. The UC Davis food safety troubleshooting guide for ferments describes normal yeast films as white, grey, or pink films on the surface, and says excessive yeast growth can cause off flavors and reduce acidity. That is kahm yeast: flat, thin, sometimes wrinkled, often powdery. I skim it off and keep going. The mother is different again: a smooth, gelatinous, translucent disc that thickens over weeks, and it is exactly what you want. Mold is the one that ends the batch. UC Davis describes mold as typically green, blue, brown, or black, growing at the air surface because it needs oxygen, and says that if you confirm mold on any part of a ferment, it should be discarded immediately. Fuzzy, raised, or colored spots mean the whole jar goes.
The health claims are mostly not supported. Cleveland Clinic notes that apple cider vinegar has not been approved to treat any health condition, that there is no concrete evidence of long-term appetite suppression, and that while it might lower blood glucose a little after a carbohydrate-heavy meal, it is not enough to manage diabetes on its own. The most-shared recent weight-loss trial, published in BMJ Nutrition, Prevention and Health in 2024, was retracted by the journal in September 2025 after statisticians could not replicate its results and found irregularities in the data. Cleveland Clinic also warns that undiluted vinegar can erode tooth enamel and can burn the esophagus. I make scrap vinegar because it is free and tastes good. That is reason enough.
Ways to Use Every Peel and Core, Ranked
Ranked by how much value each pulls from scraps for the least effort, in my kitchen.
1. Brew Apple Scrap Vinegar
Ten minutes of setup, a daily stir for two weeks, and patience after that. The result replaces a lot of the vinegar I would otherwise buy for salad dressings, pan sauces, marinades, and quick fridge pickles.
Best for: Anyone processing a big batch of apples for sauce, pie, or butter who wants a free, flavorful everyday vinegar. Not for canning.
2. Simmer a Pectin Stock
The National Center for Home Food Preservation lists apples among the fruits naturally high in pectin and notes that using the peels and cores adds pectin to the juice during cooking. Clemson Extension adds that fully ripened fruit has less pectin, which is why their jelly guidance calls for about one-fourth underripe fruit. I cover scraps with water, simmer until soft, and strain through cloth. I use the liquid to help set low-pectin fruits in refrigerator or freezer jams. If you want shelf-stable jelly, follow a tested NCHFP recipe exactly rather than improvising with homemade stock.
Best for: Jam makers, especially if some of your apples are a little underripe, and anyone making small-batch refrigerator jams.
3. Bake Apple Peel Chips
Toss peels (not cores) with a little melted butter or oil and cinnamon, spread them in a single layer, and bake low, around 250 to 275 degrees, until crisp, usually 30 to 45 minutes depending on your oven. They crisp further as they cool. The temperature and timing are my rule of thumb. Eat them within a day or two; they soften in humid weather.
Best for: Long, even peels from a peeler or apple crank, and anyone who wants a snack out of scraps the same afternoon.
4. Keep a Freezer Scrap Bag
Not every week produces a vinegar batch worth of scraps. I keep a glass container in the freezer and add peels and cores from lunchbox apples until there is enough for a jar of vinegar or a pot of pectin stock.
Best for: Households that eat apples one or two at a time rather than processing them by the bushel.
5. Compost What’s Left
The EPA lists fruit and vegetable scraps as nitrogen-rich greens for home compost and recommends at least two to three times as much volume of browns, such as dry leaves, to greens. October in Missouri hands you both at once: apple scraps from the kitchen and leaves from the yard.
Best for: Spent vinegar scraps, strained pectin pulp, bruised or moldy bits, and anything you do not have time for this week.
Skip entirely: Using your scrap vinegar to pickle or can anything for the pantry shelf, and drinking it as a daily tonic. The first is a food safety gamble with an unknown acidity; the second rests on health claims that the evidence does not support.
The Cost Math
This is an estimate, not a study. A quart of scrap vinegar costs me about 3 tablespoons of sugar and some tap water, a few cents at most, plus scraps I already paid for as apples. If it replaces a few bottles of store-bought vinegar a year, the savings are modest but real. The bigger number is the one the USDA puts on food waste nationally: roughly 133 billion pounds and 161 billion dollars of food wasted in 2010, the baseline year for its 30 to 40 percent estimate. The honest caveat: you still need to buy 5 percent commercial vinegar for canning, so scrap vinegar supplements your pantry rather than replacing it.
Your 3-Step Fix
- Next time you peel apples, set the clean peels and cores aside in a quart glass jar instead of the trash, or start a freezer scrap container.
- Cover them with sugar water at 1 tablespoon per cup, weigh them down, cover with cloth, and stir daily for 2 to 3 weeks before straining and letting the second fermentation run.
- Label the finished jar “not for canning,” keep it in the fridge, and send every spent scrap to the compost with a handful of fall leaves.
Frequently Asked Questions
Can I use apple scrap vinegar for canning or pickling?
Not for anything canned or stored at room temperature. Penn State Extension says not to use homemade vinegar for pickling because its acidity is not consistent, and the National Center for Home Food Preservation recommends vinegar of 5 percent acidity and warns against vinegar of unknown acidity. Refrigerator and freezer pickles, salads, and cooking are fine uses.
How long does apple scrap vinegar take?
In my kitchen, about 5 to 8 weeks total: 2 to 3 weeks of the first, alcoholic stage with daily stirring, then 3 to 6 weeks of undisturbed second fermentation. Penn State and NC State Extension both put the acetic stage at roughly 3 to 4 weeks under good conditions, and cooler rooms slow everything down.
Is the white film on my vinegar safe?
A smooth, gelatinous disc is the mother, which Penn State Extension says is harmless. A thin, flat, white or grey film is usually kahm yeast, which you can skim. Anything fuzzy or green, blue, brown, or black is mold, and the UC Davis fermentation guide says a ferment with confirmed mold should be discarded.
Can I skip the sugar?
Scraps alone do not carry enough sugar in plain water for a reliable ferment in my experience, and alcohol from sugar is what the vinegar bacteria turn into acid. Plain cane sugar gives me the most consistent results.
How should I store finished scrap vinegar?
I keep mine capped in the refrigerator, where in my experience it keeps well for months. For longer storage, Penn State Extension recommends pasteurizing by heating the vinegar to at least 140 degrees without exceeding 160, and NC State Extension says pasteurized, unopened vinegar keeps in excellent condition almost indefinitely.
Keep Reading
- Fermentation 101: Zero-Waste Preservation
- DIY Citrus Vinegar Cleaner
- Build a DIY Zero-Waste Compost Bin
What apple variety gives you the best scrap vinegar, and how many weeks did your last batch take to turn properly sour? Tell me in the comments; I am keeping a running list of which orchard apples ferment best.
Want more clean kitchen content like this? Join the MZWK community — practical, no-BS guides for a healthier, lower-waste kitchen without the guilt trip.
Discover more from My Zero Waste Kitchen
Subscribe to get the latest posts sent to your email.